前段时间有在 Unity 中添加定位功能的需求,先后尝试了三种方法,在此记录一下。
Unity 原生方法
Unity 提供了 LocationService,LocationInfo 和 LocationServiceStatus 三个 API 来实现定位功能。 LocationService 类用于控制定位服务和获取定位数据,LocationService 类的实例可通过 Input.location 获取。 LocationService 提供了三个属性和两个方法:
LocationServiceStatus 枚举用于表明定位服务的状态,共有 Initializing, Running, Stopped, Failed 四种状态。当 LocationService 的 status 为 Running 时,才能通过 lastData 获取到定位数据。 LocationInfo 结构存储了位置的经纬度、高度、时间戳和精度信息。
需要注意 Unity 获取到的经纬度坐标系为 WGS84 坐标系,国内应用使用的坐标系一般为 GCJ02 坐标系,百度使用的是 BD09 坐标系。如果要与国内其他地理信息服务结合使用则要进行坐标系的转换。
一开始我用 Unity 定位得到的经纬度数据去高德的坐标拾取器中查询位置,发现与真实位置有较大偏差,还以为是 Unity 获取的数据不准确,因此才又尝试了腾讯和高德的方法,后面才知道实际是因为 Unity 和高德使用的坐标系不同导致的。
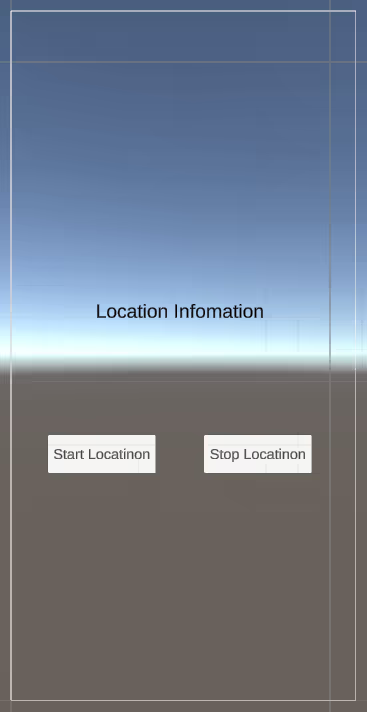
使用示例
1
2
3
4
5
6
7
8
9
10
11
12
13
14
15
16
17
18
19
20
21
22
23
24
25
26
27
28
29
30
31
32
33
34
35
36
37
38
39
40
41
42
43
44
45
46
47
48
49
50
51
52
53
54
55
56
57
58
59
60
61
62
63
64
65
| using System;
using System.Collections;
using System.Collections.Generic;
using TMPro;
using UnityEngine;
public class LocationTest : MonoBehaviour
{
public TextMeshProUGUI LocationInfo;
public IEnumerator StartLocation()
{
if (!Input.location.isEnabledByUser)
{
LocationInfo.text = "Location is not enabled by user";
yield break;
}
Input.location.Start();
int maxWait = 20;
while (Input.location.status == LocationServiceStatus.Initializing && maxWait > 0)
{
yield return new WaitForSeconds(1);
maxWait--;
}
if (maxWait <= 0)
{
LocationInfo.text = "Timed out";
yield break;
}
if (Input.location.status == LocationServiceStatus.Failed)
{
LocationInfo.text = "Unable to determine device location";
}
else
{
LocationInfo.text = $"{Input.location.lastData.timestamp}: {Input.location.lastData.longitude},{Input.location.lastData.latitude} {Input.location.lastData.altitude}";
}
}
public void StartLocationButton()
{
StartCoroutine(StartLocation());
}
public void StopLocation()
{
Input.location.Stop();
LocationInfo.text = "Location service stopped";
}
}
|
腾讯定位 SDK
国内三家主要的地图厂商中只有腾讯提供了 Unity 定位 SDK 。首先前往控制台申请 Key。创建完应用后,添加一个 Key。
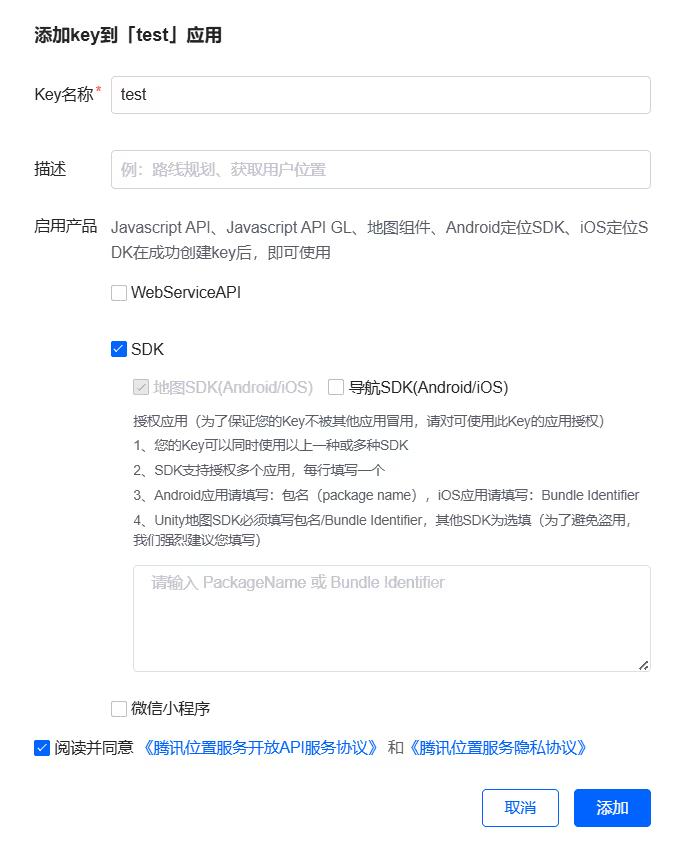
下载 SDK 后,根据发布平台将 DLL4Android 或 DLL4Ios 中的 TencentLocationSDK.dll 文件放到工程的 Assets/Plugins 目录下,并将 TencentLocationSDK.unitypackage 导入到工程中。可根据需要选择平台和架构。
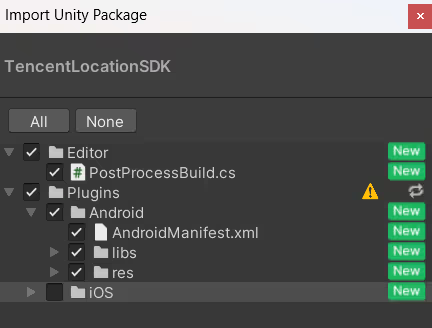
下面先解决发布时会遇到的一些错误。
x86_64 架构的库文件配置有误,发布时会报错,需要将 CPU 选项从 ARMv7 改为 X86_64
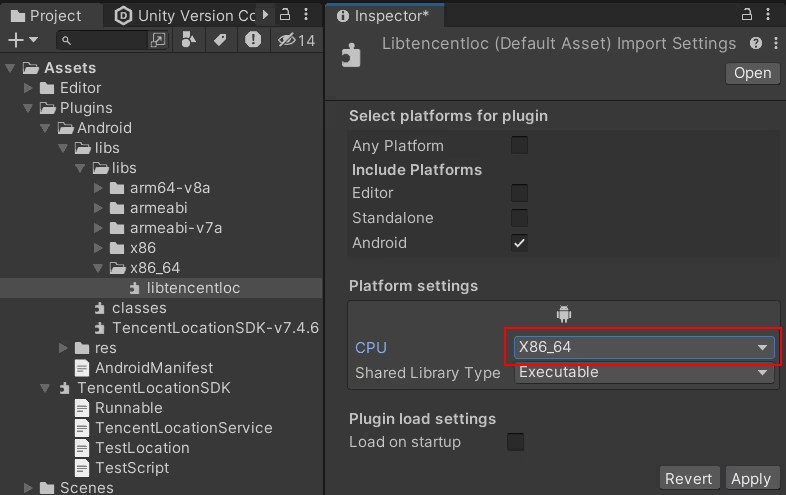
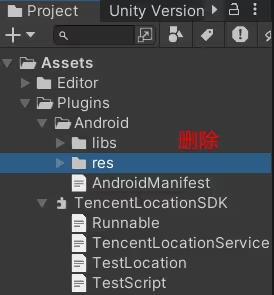
删除 Plugins/Android 目录下的 res 文件夹
在 AndroidManifest.xml 的 Activity 标签中添加 android:exported="true"
1
2
3
4
5
6
7
8
9
10
| <activity
android:name="com.tencent.tencentlocation.MainActivity"
android:configChanges="orientationkeyboardHiddenscreenSize"
android:exported="true">
<intent-filter>
<action android:name="android.intent.action.MAIN" />
<category android:name="android.intent.category.LAUNCHER" />
</intent-filter>
</activity>
|
还是简单创建一个有文本和两个按钮的场景,将 dll 文件中的 TencentLocationService 脚本挂载到一个物体上,并填写自己的 API Key。
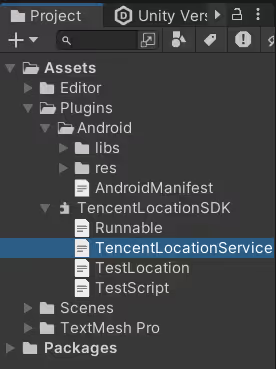

在 TencentLocationService 脚本挂载的物体上新建一个脚本,内容如下。腾讯定位 SDK 基本与 Unity 原生的方法类似,可以通过两种方式获取定位数据,第一种是像原生方法一样直接访问 tencentLocationService.lastData,第二种是通过 OnLocationUpdate 回调获取。下面使用了第二种回调的方法,只要在挂载了 TencentLocationService.cs 的物体上的任意脚本中实现 ILocationListener 接口就可以从 OnLocationUpdate 回调中实时获取到定位信息。
1
2
3
4
5
6
7
8
9
10
11
12
13
14
15
16
17
18
19
20
21
22
23
24
25
26
27
28
29
30
31
32
33
34
35
36
37
38
39
40
41
42
43
44
45
46
47
48
49
50
51
52
53
54
55
56
57
58
59
|
public class LocationTest : MonoBehaviour, ILocationListener
{
public TextMeshProUGUI infoText;
public TencentLocationService locationService;
void Awake()
{
TencentLocationService.SetAgreePrivacy(true);
}
public void StartLocation()
{
if(locationService.status == TencentLocationServiceStatus.Ready locationService.status == TencentLocationServiceStatus.Stopped)
{
locationService.Start();
}
}
void Update()
{
switch (locationService.status)
{
case TencentLocationServiceStatus.Initializing:
infoText.text = "Location Service Initializing";
break;
case TencentLocationServiceStatus.Ready:
infoText.text = "Location Service Ready";
break;
case TencentLocationServiceStatus.Failed:
infoText.text = $"Location Service Failed. ErrorCode: {locationService.errorCode}";
break;
}
}
public void StopLocation()
{
locationService.Stop();
infoText.text = "Location Service Stopped";
}
public void OnLocationUpdate(string locInfo)
{
TencentLocationInfo info = Util.ParseLocationInfo(locInfo);
infoText.text = $"{info.timestamp}: {info.latitude}, {info.longitude}, {info.altitude}";
}
}
|
因为项目中要用到另外一个插件,一直搞不定腾讯定位和另一个插件的 AndroidManifest.xml 文件合并的问题,所以又尝试了使用高德的定位 SDK。
高德定位 SDK
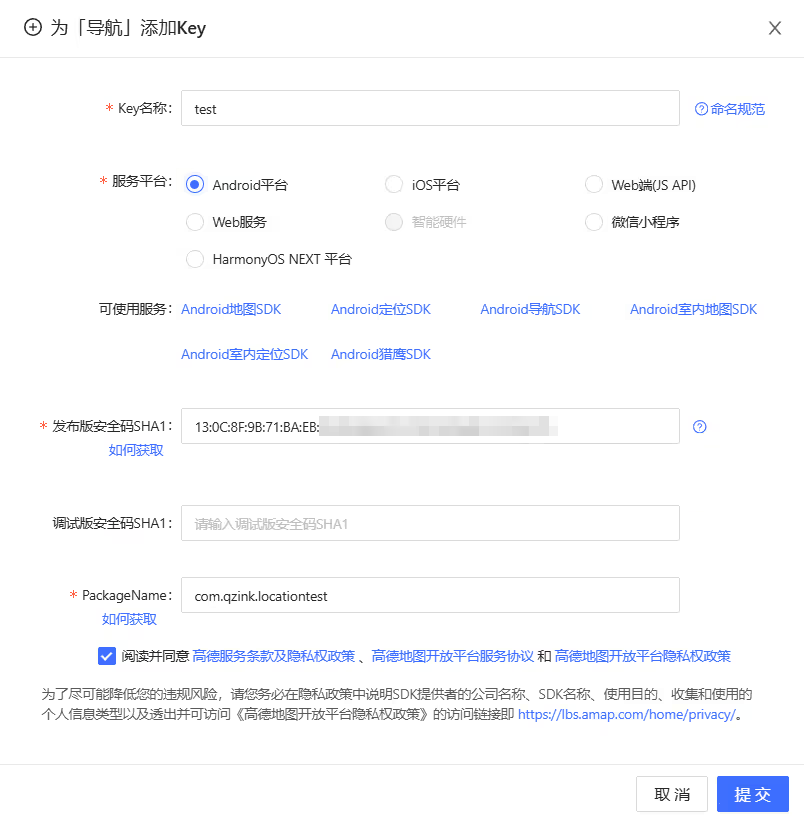
高德并没有直接提供 Unity 上的 SDK,所以只能在 Unity 中调用 jar 包来实现功能,相较于前两种方式复杂一些。 首先到控制台申请 API Key,SHA1 码的获取可参考常见问题,包名需要和 Unity 中的配置一致。Unity 中包名在 Project Settings-Player 设置。

下载 SDK,解压后将 jar 包放到 Assets\Plugins\Android 目录下,然后在 Player Setting-Publish Settings 中开启 Custom Main Manifest。
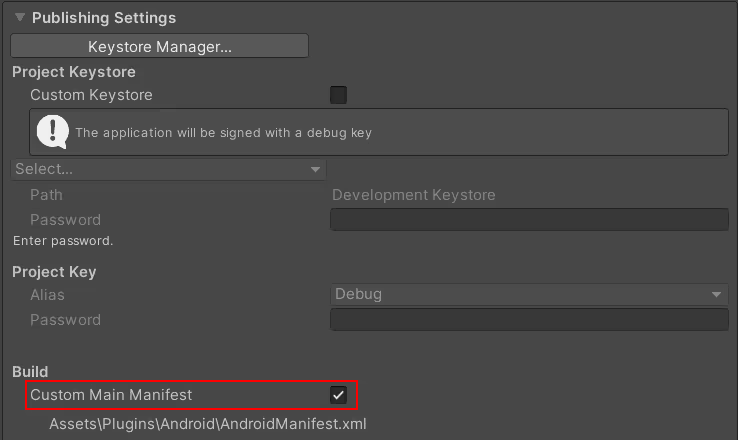
这会在 Assets\Plugins\Android 目录中生成 AndroidManifest.xml 文件,参考下面代码修改清单文件。
1
2
3
4
5
6
7
8
9
10
11
12
13
14
15
16
17
18
19
20
21
22
23
24
25
26
27
28
29
30
31
32
33
34
35
36
37
38
39
40
41
42
43
| <?xml version="1.0" encoding="utf-8"?>
<manifest
xmlns:android="http://schemas.android.com/apk/res/android"
package="com.unity3d.player"
xmlns:tools="http://schemas.android.com/tools">
<uses-permission android:name="android.permission.ACCESS\_COARSE\_LOCATION"></uses-permission>
<uses-permission android:name="android.permission.ACCESS\_FINE\_LOCATION"></uses-permission>
<uses-permission android:name="android.permission.ACCESS\_NETWORK\_STATE"></uses-permission>
<uses-permission android:name="android.permission.ACCESS\_WIFI\_STATE"></uses-permission>
<uses-permission android:name="android.permission.CHANGE\_WIFI\_STATE"></uses-permission>
<uses-permission android:name="android.permission.INTERNET"></uses-permission>
<uses-permission android:name="android.permission.WRITE\_EXTERNAL\_STORAGE"></uses-permission>
<uses-permission android:name="android.permission.ACCESS\_LOCATION\_EXTRA\_COMMANDS"></uses-permission>
<uses-permission android:name="android.permission.FOREGROUND\_SERVICE"/>
<uses-permission android:name="android.permission.ACCESS\_BACKGROUND\_LOCATION"/>
<application>
<activity android:name="com.unity3d.player.UnityPlayerActivity"
android:theme="@style/UnityThemeSelector">
<intent-filter>
<action android:name="android.intent.action.MAIN" />
<category android:name="android.intent.category.LAUNCHER" />
</intent-filter>
<meta-data android:name="unityplayer.UnityActivity" android:value="true" />
<meta-data android:name="com.amap.api.v2.apikey" android:value="你的Key"/>
</activity>
<service android:name="com.amap.api.location.APSService"></service>
</application>
</manifest>
|
依然是两个按钮一个文本的布局,创建如下两个脚本。代码中用到了 AndroidJavaClass, AndroidJavaObject 和 AndroidJavaProxy 来与高德定位 jar 包代码进行交互。通过 AndroidJavaProxy 用 C# 实现了 Java 接口,在 C# 脚本中处理定位回调的逻辑。下面只是最简单的示例,可以参考官方文档对定位进一步配置。
1
2
3
4
5
6
7
8
9
10
11
12
13
14
15
16
17
18
19
20
21
22
23
24
25
26
27
28
29
30
31
32
33
34
35
36
37
38
39
40
41
42
43
44
45
46
47
48
49
50
51
52
53
54
55
56
57
58
59
60
61
62
63
64
65
66
67
68
69
70
71
72
73
74
75
76
77
78
79
80
81
82
83
84
85
86
87
88
89
90
91
| using System;
using TMPro;
using UnityEngine;
public class LocationTest : MonoBehaviour
{
AndroidJavaClass unityPlayerClass;
AndroidJavaObject currentAcitivity;
AndroidJavaObject locationClient;
AndroidJavaClass locationClientClass;
AndroidJavaObject locationOption;
LocationListener locationListener;
public TextMeshProUGUI InfoText;
public void StartLocation()
{
unityPlayerClass = new AndroidJavaClass("com.unity3d.player.UnityPlayer");
currentAcitivity = unityPlayerClass.GetStatic<AndroidJavaObject>("currentActivity");
locationClientClass = new AndroidJavaClass("com.amap.api.location.AMapLocationClient");
locationClientClass.CallStatic("updatePrivacyAgree", currentAcitivity, true);
locationClientClass.CallStatic("updatePrivacyShow", currentAcitivity, true, true);
locationClient = new AndroidJavaObject("com.amap.api.location.AMapLocationClient", currentAcitivity);
locationOption = new AndroidJavaObject("com.amap.api.location.AMapLocationClientOption");
locationClient.Call("setLocationOption", locationOption);
locationListener = new LocationListener();
locationListener.OnLocationChangedEvent += OnLocationChanged;
locationClient.Call("setLocationListener", locationListener);
locationClient.Call("startLocation");
}
public void StopLocation()
{
locationClient?.Call("stopLocation");
locationClient?.Call("onDestroy");
InfoText.text = "Location Stopped";
}
public void OnLocationChanged(AndroidJavaObject location)
{
if(location != null)
{
if (location.Call<int>("getErrorCode") == 0)
{
try
{
InfoText.text = $"{location.Call<long>("getTime")}: {location.Call<double>("getLongitude")}, {location.Call<double>("getLatitude")}";
}
catch (Exception e)
{
Debug.LogError(e);
}
}
else
{
InfoText.text = $"Location Error:{location.Call<int>("getErrorCode")} {location.Call<string>("getErrorInfo")}";
}
}
}
}
using UnityEngine;
public class LocationListener : AndroidJavaProxy
{
public delegate void LocationChangedDelegate(AndroidJavaObject location);
public event LocationChangedDelegate OnLocationChangedEvent;
public LocationListener() : base("com.amap.api.location.AMapLocationListener") { }
public void onLocationChanged(AndroidJavaObject location)
{
OnLocationChangedEvent?.Invoke(location);
}
}
|
高德定位获取到的信息相比于前两种方法要更丰富些,除了经纬度还可以获取到城市、地址、方位角等信息。
高德方案参考:Unity 接入高德定位 sdk 简单三步无需与安卓工程交互_高德地图 unity sdk-CSDN 博客
总结
- Unity 原生定位:经纬度信息为 WGS84 坐标系,和国内其他服务一起使用需要转换坐标系
- 腾讯定位:经纬度信息为 GCJ02 坐标系,和其他插件同时使用可能会有冲突
- 高德定位:经纬度信息为 GCJ02 坐标系,定位信息丰富,涉及到 Unity 和 Java 代码的交互,相对复杂些
项目源码


